# Accessing GeoPackage data via GIS software

The following page provides step-by-step instructions on how to access GeoPackage data via ArcMap, QGIS, MapInfo Professional, ArcGIS Pro and CadCorp.

<details>

<summary>ArcMap</summary>

#### Requirements:

* ArcMap (version 10.2.2 or later)
* A GeoPackage dataset

These instructions were created using ArcMap version 10.7, but versions from 10.2.2 onwards will also support GeoPackage features.\
\
Note: Certain versions of ArcMap (for example, version 10.8.1) require GeoPackages to have a spatial index added before the data can be viewed on the map. This can be done in the Catalog by opening the Feature Class Properties window within the 'Indexes' page.\
\
![ArcMap Feature Class Properties window showing Attribute Indexes options and spatial index options](/files/NegvdymXMwLBD2HWvvhT)<br>

1. Open ArcMap.
2. Once ArcMap loads, select the *Add Data* button. The icon is an orange-coloured diamond shape with a black plus symbol on top; it can be found in the ribbon at the top of the workspace.<br>

   <figure><img src="/files/Ti65wln0Ti6Chpqjfq22" alt="The Add Data button in ArcMap." width="58"><figcaption><p>Add data button<br></p></figcaption></figure>

   \
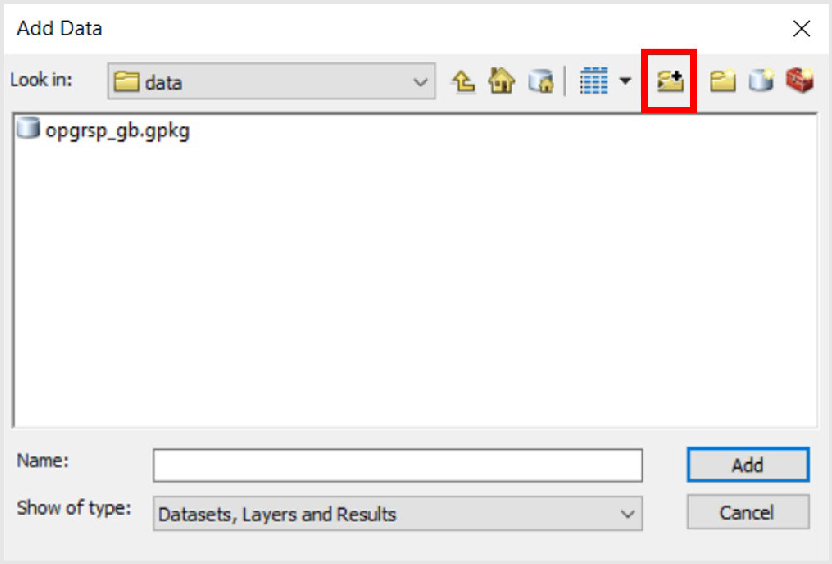
   If the *Add Data* button is not visible, an alternate method to add data is to select *File* > *Add Data* > *Add Data*. An Add Data dialog box will appear which will be similar to the following screenshot:<br>

   <figure><img src="/files/YH1n0cdTUyQRbszKuWC8" alt="Add Data dialog box with the Add Folder button highlighted by a red square shape." width="375"><figcaption><p>Add Data dialog box with the Add Folder button highlighted</p></figcaption></figure>

   \
   If you have not yet connected to the appropriate folder in which you are storing the GeoPackage data, you can connect to it by selecting the *Add Folder* button:<br>

   <div align="left"><figure><img src="/files/yLPNBSJIbvkT79zRhJVF" alt="The Add Folder button in ArcMap." width="46"><figcaption></figcaption></figure></div>
3. Once you have connected to the appropriate folder, locate the GeoPackage to upload into ArcMap. The .gpkg file will look similar to the one in the following screenshot:<br>

   <figure><img src="/files/XEvoGfPuJ0AuHHCr2oCC" alt="Add Data dialog box with an example GeoPackage file highlighted by a red rectangle shape." width="375"><figcaption><p>Add Data dialog box with an example GeoPackage file highlighted</p></figcaption></figure>
4. Double-click on the GeoPackage file to reveal the layers within it. Select the layers you want to upload into ArcMap.<br>

   <figure><img src="/files/SMxbThqX8PyIYWr5Tf6Y" alt="Add data dialog with main.AccessPoint and main.GreenspaceSite layers available and highlighted in a red box" width="375"><figcaption><p>Add data dialog with main.AccessPoint and main.GreenspaceSite layers available and highlighted</p></figcaption></figure>
*More than one layer can be selected at any time by holding down shift and clicking on multiple layers.*

5. Add the relevant selected GeoPackage layers into the map by clicking the *Add* button.
6. The GeoPackage layers should now be viewable in the layers list in the Table Of Contents on the left- hand side of the workspace.

</details>

<details>

<summary>QGIS</summary>

#### Requirements:

* QGIS (version 2.10.1 or later)
* A GeoPackage dataset

These instructions were created using QGIS version 3.14. Other versions of QGIS can be used, from version 2.10.1 onwards.

1. Open a new or existing QGIS project.
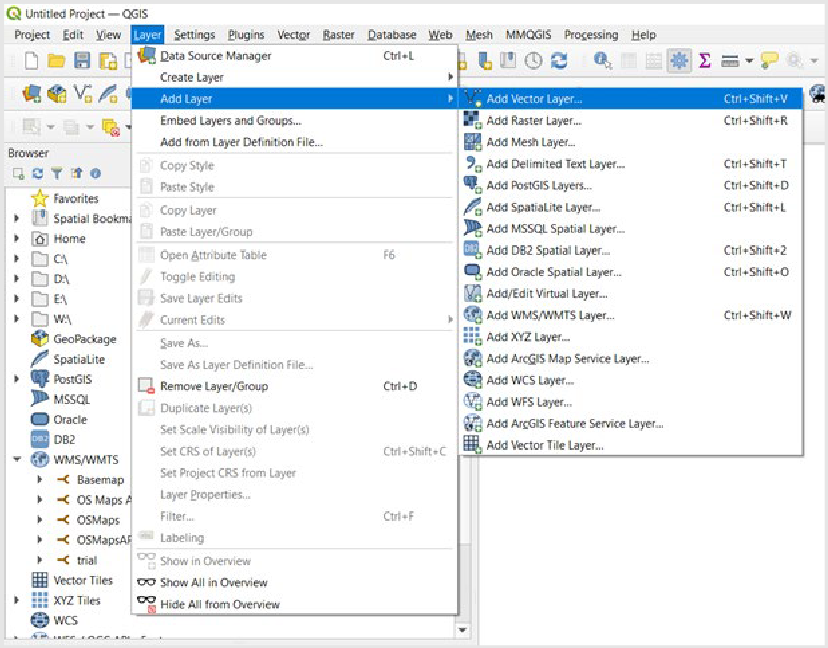
2. On the top ribbon of the workspace, add a layer by selecting *Layer* > *Add Layer* > *Add Vector Layer.*<br>

   <figure><img src="/files/PoGIao2PCZMqk4MPImoD" alt="Screenshot showing how to locate the Add Vector Layer option from the top ribbon of the workspace." width="563"><figcaption><p>Screenshot showing how to locate the Add Vector Layer option from the top ribbon of the workspace.</p></figcaption></figure>

Alternatively, you can simply select the *Add Vector Layer* button:

<img src="/files/4YaXonU4lqceLtjS4IMQ" alt="The Add Vector Layer button in QGIS." data-size="original">

3. A dialog box will appear. Here, it is possible to select the GeoPackage that will be loaded using the *three dots* button located next to the Vector Dataset(s) box. Click the *three dots* button.<br>

   <figure><img src="/files/Q36AoLr0z2GK6Rbptcyy" alt="Data Source Manager Vector dialog box with the three dots button highlighted by a red square shape" width="563"><figcaption><p>Data Source Manager Vector dialog</p></figcaption></figure>
4. Navigate to the GeoPackage. Double-click the file or select it, then click *Add*.
5. A separate dialog box will appear. Here, the layers of the GeoPackage can be selected and added to a map. It is possible to add selected layers, numerous layers or all layers.<br>

   <figure><img src="/files/qD2x6aPb7lw9YesFErlA" alt="Select Vector Layers to Add… dialog box with the OK button highlighted by a red rectangle shape." width="563"><figcaption><p>Select Vector Layers dialog box</p></figcaption></figure>
6. Once the relevant layers have been selected, click *OK*.
7. The GeoPackage layers should now be viewable in the layers list on the left-hand side of the workspace.

</details>

<details>

<summary>MapInfo Professional</summary>

#### Requirements:

* MapInfo Professional (version 15.2 or later)
* A GeoPackage dataset

These instructions were completed using MapInfo Professional version 2019; however, any version from 15.2 onwards can be used.

1. Start MapInfo Professional.
2. Select *Open* > *Table* in the top ribbon.<br>

   <figure><img src="/files/ubsVesrmic6zKxYcBhAf" alt="Screenshot showing the top ribbon in MapInfo Professional. The Open button is highlighted by a red rectangle shape."><figcaption><p>The top ribbon in MapInfo Professional</p></figcaption></figure>
3. A dialog box will appear where you can search for the appropriate GeoPackage. Once located, select the GeoPackage and click *Open*.<br>

   <figure><img src="/files/vRV83YV39cTHontxcTYL" alt="Open dialog box with the Open button highlighted by a red rectangle shape." width="563"><figcaption><p>Open dialog box with the Open button highlighted</p></figcaption></figure>
4. Another dialog box will appear. Here, it is possible to select which layers to import into MapInfo Professional from the GeoPackage.<br>

   <figure><img src="/files/dmBS9rUR6E1AKqqYlrjV" alt="Select One or More Tables to Open dialog box with the OK button highlighted by a red rectangle shape." width="563"><figcaption><p>Select One or More Tables to Open dialog box with the OK button highlighted by a red rectangle shape.</p></figcaption></figure>
5. Once the layers have been selected, click *OK*.
6. The data should now be available in your workspace.

</details>

<details>

<summary>ArcGIS Pro</summary>

#### Requirements:

* ArcGIS Pro (version 1.1 or later)
* A GeoPackage dataset

These instructions were created using ArcGIS Pro version 2.5, but versions from 1.1 onwards will support GeoPackage.\
\
Note: Certain versions of ArcPro (for example, version 2.5) require GeoPackages to have a spatial index added before the data can be viewed on the map. This can be done in the Catalog by opening the Feature Class Properties window within the 'Indexes' page.\
\
![ArcGIS Pro feature class properties window showing the attribute index and spatial index options](/files/ChMM01CGDkRHSLqsPmrT)<br>

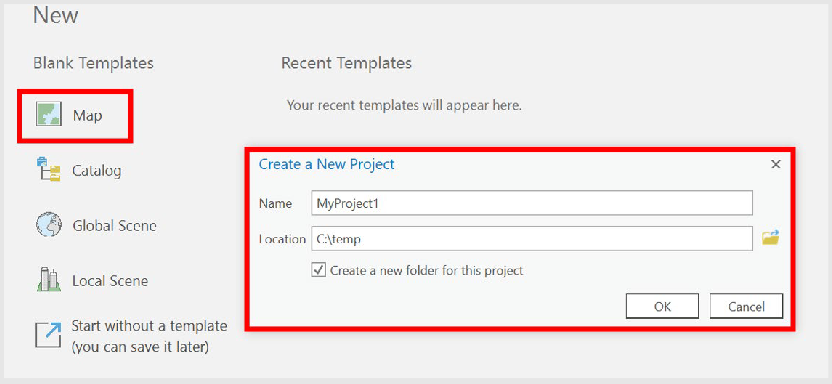
1. Start ArcGIS Pro, then open an existing project or create a new one. To create a new project, select *Map* from the Blank Templates section, then enter a *Name* and a *Location* for the project in the Create a New Project section. Click *OK*.<br>

   <figure><img src="/files/GG5Z8a0wJVvr179hElFH" alt="Screenshot showing how to create a new project in ArcGIS Pro." width="563"><figcaption><p>Screenshot showing how to create a new project in ArcGIS Pro.</p></figcaption></figure>
2. In the ribbon at the top of the project, select *Map* > *Add Data*.<br>

   <figure><img src="/files/5ZaJ1zgsQYbpfsQwfkrr" alt="The Add Data button in ArcGIS Pro." width="66"><figcaption></figcaption></figure>
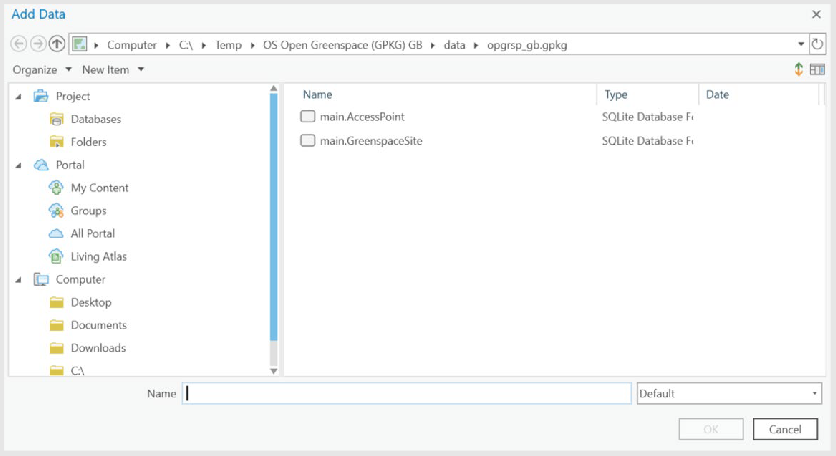
3. A dialog box will appear. Navigate to the GeoPackage to be added into ArcGIS Pro. Select the GeoPackage and click *Open*. This will open the GeoPackage to reveal the individual layers.<br>

   <figure><img src="/files/khzWII3Cc8oYncZTSaVv" alt="Add Data dialog box with the Open button highlighted by a red rectangle shape." width="563"><figcaption><p>Add Data dialog box with the Open button highlighted by a red rectangle shape.</p></figcaption></figure>
4. The layers can be selected either individually or together. Once the relevant layers have been selected, click *OK*. The selected layers will then be added into ArcGIS Pro.

* *More than one layer can be selected at any time by holding down shift and clicking on multiple layers.*<br>

  <figure><img src="/files/D5BfUhKfDpH1h9wZEdqM" alt="Add data dialog and file explorer shown main.AccessPoint and main.GreenspaceSite files present"><figcaption><p>Add data dialog and file explorer shown main.AccessPoint and main.GreenspaceSite files</p></figcaption></figure>

5. The layers added into ArcGIS Pro will appear in the contents pane on the left-hand side of the project.

</details>

<details>

<summary>CadCorp</summary>

#### Requirements:

* CadCorp SIS
* A GeoPackage dataset

These instructions were created using CadCorp SIS 9 Desktop Express; however, other versions of CadCorp can support GeoPackage.

1. Start CadCorp SIS.
2. In the upper ribbon, select *Add Overlay*.<br>

   <figure><img src="/files/jgmOA3w4GkCNfSeRng6F" alt="Screenshot showing the upper ribbon in CadCorp SIS. The Add Overlay button is highlighted by a red rectangle shape."><figcaption><p>Screenshot showing the upper ribbon in CadCorp SIS.</p></figcaption></figure>
3. A dialog box will appear. Select *Files* > *File*.<br>

   <figure><img src="/files/auqxheTuMr6vR5y9MbaZ" alt="Overlay Types dialog box with the File option highlighted by a red rectangle shape."><figcaption><p>Overlay Types dialog box with the File option highlighted by a red rectangle shape.</p></figcaption></figure>
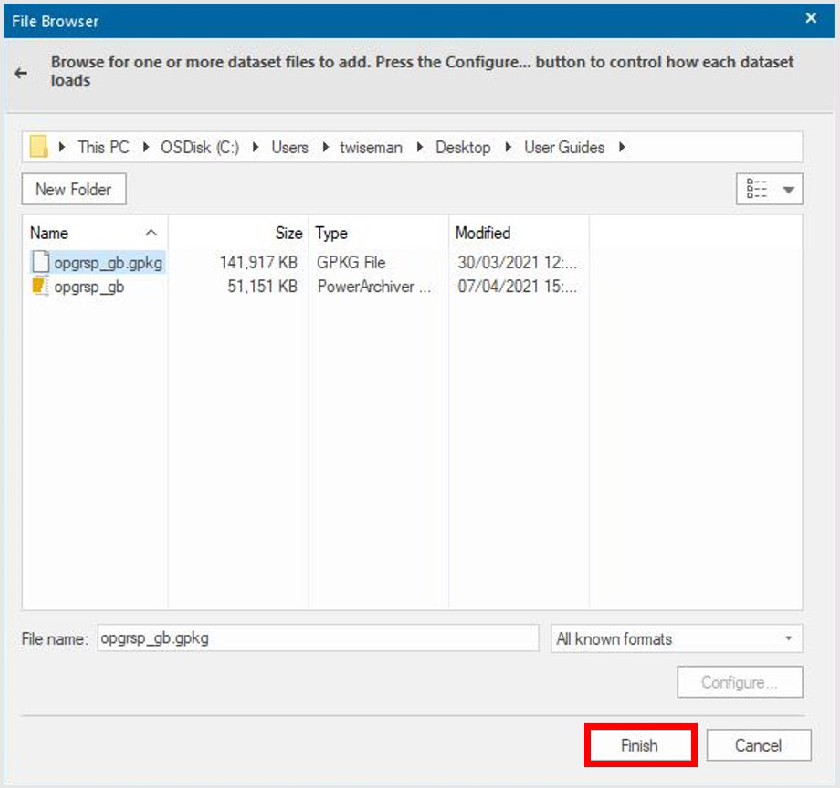
4. From here, another dialog box appears where you can map to where the GeoPackage has been stored locally.<br>

   <figure><img src="/files/zL0B82pGfj38UnEZtCRL" alt="File Browser dialog box with the Finish button highlighted by a red rectangle shape."><figcaption><p>File Browser dialog box with the Finish button highlighted</p></figcaption></figure>
5. Once the correct GeoPackage has been located, click *Finish*.
6. The data should now appear on the map.

### Using relation tables in CadCorp

As well as the geometry table, OS NGD GeoPackages contain tables of other relationships. These can be accessed using **Overlays** ![Overlays icon showing three flat squares stacked horizontally behind a cog.](/files/9122f14b3c51649d6fdf2ed1cbae57fe9822e5e4) or right click on the table and properties.

1. From the Overlays window select the correct **Schema** and then **Join > Connect** to a **File-based database.**

   <figure><img src="/files/256b69ed5dd995f1f47e80fe3800bf5cd29f4c76" alt="A screenshot of of the overlays window showing OSID selected in the Schema tab."><figcaption><p>CadCorp Overlays window</p></figcaption></figure>

   <figure><img src="/files/e2ac9d9b78dcbc605ea0c0238bb462a265811fcc" alt="The Database Types window showing File-based database selected."><figcaption><p>Database Type selection window</p></figcaption></figure>

2. Click next and select your GeoPackage. Once selected, click next to continue.

3. In the Recordset window select the Database Table that you wish to join and click the green arrow to select the contents of the table.

   <figure><img src="/files/c4bc68030d48691be87b06bdbfb2b8b379fdebcb" alt="Recordset window shorwing str_fts_compoundstructure_rltenty selected in the Database Tables/Columns menu"><figcaption><p>Recordset window</p></figcaption></figure>

4. You then need to set up the columns you want to join the tables on. \
   \
   In the Join Configuration window choose the fields you wish to join – it is usually the OSID of the geometry table and a crossfererenceid/featuretypeid in the related table.<br>

   Select the columns you wish to join and Append columns to Schema<br>

   <figure><img src="/files/99d0693affea3fee3b4487b580a0706399474467" alt="A screenshot of the Configuration window showing Join from osid$ to Table Column featuretypeid"><figcaption><p>The configuration window</p></figcaption></figure>

Your table should now show the related elements

</details>


---

# Agent Instructions: Querying This Documentation

If you need additional information that is not directly available in this page, you can query the documentation dynamically by asking a question.

Perform an HTTP GET request on the current page URL with the `ask` query parameter:

```
GET https://docs.os.uk/os-downloads/resources/product-resources/getting-started-with-geopackage-and-vector-tiles-guides/getting-started-with-geopackage/accessing-geopackage-data-via-gis-software.md?ask=<question>
```

The question should be specific, self-contained, and written in natural language.
The response will contain a direct answer to the question and relevant excerpts and sources from the documentation.

Use this mechanism when the answer is not explicitly present in the current page, you need clarification or additional context, or you want to retrieve related documentation sections.